May 29, 2011

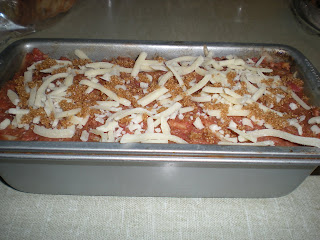
Loaded Potato Stuffed Meatloaf


Meatloaf is often thought of as boring and mundane, something you grew up eating at your mother’s kitchen table (dry and tasteless) or as “meat surprise” in school (a slice of some kind of meat topped with ketchup served on a tray with instant mashed potatoes and green beans ... where the only thing that could make the meat more edible was by covering it with more ketchup and trying not to think about what might be in it). Whether it was “Mom’s meatloaf” or the School Cafeteria variation, it rarely left a good impression!

Nowadays, you can find quite a few good meatloaf recipes floating around out there. I make meatloaf for dinner every so often, so I will have a few good recipes to experiment with and share, but this one is a variation on one of my favourite types of meatloaf to eat: Stuffed Meatloaf.

I’m not even sure where the idea for this came from, perhaps something I saw on TV somewhere (I love that show ‘Diners, Drive-Ins and Dives’) ... but it has been rolling around in my mind lately to make a meatloaf that was reminiscent of a loaded baked potato. I love loaded baked potatoes, and so I decided to try a Loaded Potato Stuffed Meatloaf.

Meatloaf, like meatballs, is rarely made with pure ground Beef. A mix of Ground Beef, combined with ground Pork and ground Veal makes the meat more tender and less dense, and adds a depth of flavour. For this recipe, you’ll make the basic meatloaf mix as per usual, with the addition of some BBQ Sauce and Bacon Bits/Chopped Bacon, but you’ll stuff it with a Potato mixture that adds some moisture, some colour, a different texture, and some interesting flavour! 

Ingredients:

1 lb.                 Meatloaf Mix – 1/3 each of Ground Beef, Pork and Veal
1 Cup              Bread Crumbs
¼ Cup             Onion, chopped finely
¼ Cup             Bacon Bits or Chopped Bacon
¼ Cup             Parmesan Cheese, grated
¼ Cup             Shredded Cheese – cheddar (optional)
¾ Cup             Ketchup
¼ Cup             BBQ Sauce – your favourite type
2 TB                Dijon Mustard
2 tsp.               Worcestershire Sauce
1 tsp.               Liquid Smoke (optional)
1                      Egg (beaten)
Parsley, chopped finely
Spicy Mesquite Spice Mix (I had it on hand ... I didn’t use salt or pepper in this recipe because this Spice Mix includes them both. If you don’t use this spice mix, I would add salt and pepper to taste).
1 TB                Brown Sugar
2                      Potatoes (I use Yukon Gold), peeled

Directions:

Combine: Ground Meat, Bread Crumbs, Onion, Bacon Bits, Parmesan cheese, Shredded Cheese, Parsley, Spicy Mesquite Spice mix in a bowl and the beaten Egg.


In another bowl, combine: Ketchup, BBQ Sauce, Mustard, Worcestershire Sauce, Liquid Smoke.


Add wet ingredients into the Beef mixture. [optional: can save 1/4 Cup for glazing]

Use your hands and make sure all ingredients are well mixed.

For the Potato Stuffing: Cut your potatoes into smaller pieces and boil for about 20 minutes until they come apart with a fork. Drain. When slightly cooled, smash them with a fork and add a pinch of salt, bacon bits, sour cream, chopped chives and shredded cheddar cheese. Mix together well to combine. [Alternatively, if you have leftover mashed potatoes, this is a great place to use them ... just add a couple of the “fixin’s” and use up your leftovers]

Now, lightly oil your meatloaf pan – it should be a shallow 7 by 10 in. pan or bread loaf tin.

Use about half the Meatloaf mixture and layer the bottom and sides of the pan, leaving a hollow ditch in the middle.


Spoon the Potato Stuffing mixture into the hollow and press gently to smooth it out.


Then layer the rest of the Meatloaf mixture on top to cover.

Brush the top gently with the reserved wet ingredients from before OR sprinkle with cheese and a touch of brown sugar.


Cover with foil and bake in a 350 degrees Fahrenheit oven for 60 – 75 minutes, or until a meat thermometer registers 170 degrees F (75 degrees C). Uncover for the last 5 minutes or so.

Let Meatloaf sit for 5 minutes before slicing and serving.


I don’t make mine with gravy because I find it is moist enough without. I usually serve with a side of steamed broccoli and/or carrots.

I find that Meatloaf reheats very well and is good in sandwiches the next day.

May 17, 2011

Let's Talk Clematis ...


CARING FOR CLEMATIS:

Clematis need 2 main ingredients to be happy and healthy in your garden.

1. The first is consistent moisture. Contrary to popular opinion, clematis do not require “shaded feet” specifically ... what they really need, and what is present in that shaded soil (whether it is shaded by mulch, rocks or other shallow-rooted plants) is moisture. Moist soil is what Clematis crave ... they love being watered deeply but do not do well in standing water so proper placement is very important.

2. The other key to clematis success is treating all pruning types of clematis as Group 3 types for their  first 2-3 years in the ground. This stimulates root development and the emergence of more stems from the ground. Also, if you plant your Clematis several inches deeper in the ground than they are in their original containers, it can result in new stems that develop from the soil line and also gives the plant a base to resurrect from in case it is killed back to ground level for some reason. Being cut back every Spring for the first couple years will promote more basal growth and more flowering stems. 

I cannot stress too much that proper pruning of these young plants is absolutely critical for their future growth and development. All too often I have seen a perfectly good little clematis which has been planted out and allowed to develop one very long, spindly growth. And the owners have complained that either it's a weak plant or it doesn't flower well when the only real problem is how it's been treated. A plant like this will take years to develop properly if it ever does.  Roots and top growth need to develop proportionately. Top growth needs to be restrained until root growth is sufficient to support it.

PRUNING CLEMATIS:

Pruning Group 1 (A) – The Ramblers and Early Bloomers
These will flower on "old wood"- i.e., previous season's growth. Light pruning to remove any dead bits and neaten it up is all that's needed. They don't require any pruning, but if you're going to do it, do it right after bloom. Whatever grows between the time you prune and the following spring probably won't bloom next year, but all the old wood will, and you can control the growth of ramblers beautifully that way. (In other words, if you want your Clematis to grow only 7 feet tall, for instance, prune it back to 7 feet right after it blooms. The only other reason to prune your Group 1 Clematis is to remove any dead or diseased growth.

Pruning Group 2 (B) – The Big Flowered Summer Bloomers
Group 2 Clematis mainly blooms on "old wood," which simply means stems that grew last season or earlier (but will also sometimes bloom on some newer wood as well). You don't want to prune too radically. Remember that the largest flowers will be produced on old wood, so you don't want to remove too much.  The rule of thumb is that in earliest spring, cut back each stem about 6 to 8 inches, to right above the point where it branches. At this branching point, you should see a pair of little bumps. These are buds, and you want to keep them. These are repeat bloomers so you’ll want to prune again immediately after flowering

Pruning Group 3 (C) – The Late Bloomers
Unlike other types of Clematis, Group 3 blooms on "new wood" (which means the current season's growth; if you keep last year's flowering stems on the plant, they won't set buds).
Remove all the old growth until you're left with a couple of stems about 6-12 inches from the ground.  Be ruthless, ignore the fat buds you see further up the stem, and cut back to a height of roughly 6"-12" (this should include 2 strong sets of buds). You will be rewarded by the emergence of vigorous new shoots from the base which will result in a nice, full, multi-stemmed plant loaded with flowers.

Late season pruning of clematis is not recommended in areas which experience cold winters.  Any unexpected warm spell will encourage new growth which will certainly be killed by the cold spell that follows.  So resist the temptation to tidy up the clematis tangles in the fall...wait until Spring.

Bloom Timing -
Clematis Group 1 are the earliest Clematis to flower, they’ll give you Spring blooms. Clematis Group 2 begin their main bloom season in early summer, about the same time as Roses (which is why they are such great companions). Many bloom most heavily in early summer, then steadily for the rest of the season; others offer a big flush in early season, then repeat (often not as profusely) in late summer and into fall. Clematis Group 3 begins to flower in mid-summer and will continue into fall. 

 
You want to allow the plant to develop three to five sets of leaves and then pinch the growing tip off. This will stimulate auxiliary bud breaks which will double the number of vines that can produce flowers. Once these new buds break and start developing into vines with about three-five sets of leaves, pinch those growing tips off. Failure to prune all clematis as type III clematis at least the first if not the second year and failure to pinch off growing tips are prime reasons why clematis plants stay single stemmed plants that fail to prosper.

Pruning this way will also encourage both branching and the development of multiple stems from the buds underground. This is particularly important for group B clematis which are notoriously reluctant to fatten up at the base. Two or more years of this treatment may be necessary for the plant to develop a satisfactory framework, but the rewards in terms of future flowering and general appearance are well worth it. During this time flowering is not sacrificed, rather delayed until later in the season.I know it sounds harsh, but it works!

Fertilizing –
And finally, a word about fertilization. Fertilization is important but you can have too much of a good thing. Some people claim that limey soil benefits Clematis but the benefits seem varied. Too much nitrogen will promote nothing but vegetative growth. Phosphorus (the middle number) is the most important because it stimulates root growth and ultimately bloom production. A slow release fertilizer is preferable. I tend to use compost and then water in a tomato fertilizer, once in the Spring and then once in the Fall. It gets the Clematis growing like gangbusters!

PICTURES:

These are actually three different Clematis plants, to show what they look like in the Spring and how to pinch off the growing tips to prune it down to around 12" tall.

Once the snow clears and the brown vines begin to leaf out a little, it looks like this:


Close-up of buds (that you are about to prune off):


The final pinched-back plant - after pruning:


This one is a new plant from last summer, so it still only has 1 stem. I left 3 sets of leaves, and once it branches out a bit, I will pinch each new vine back again. This kind of specialized attention for the first couple years is how you get a multi-branched, healthy plant.

May 13, 2011

' I never knew anyone who was the worse for being a gardener ... '

May 09, 2011


Gardening is a way of showing that you believe in tomorrow.

What grows in the garden, so lovely and rare?
Roses and Dahlias and people grow there.
 
-   A Gardener's Diary

April 23, 2011

Tuscan Painted Pots

Its funny how things change. When you are young, you think gardening is a waste of time and you resent being dragged along to nurseries, or having to help water the plants when the weather predicts rain in a day or two anyways ... But in time you grow up, get your own place, and suddenly it doesn't feel so foreign to want to grow something in that backyard instead of just maintaining a lawn. And so my younger sister, who teased me just 2 short years ago about playing around in the dirt, is now thinking about growing tomatoes and flowers, and she likes Clematis!

For her birthday this year, I wanted to give her a couple herbs to grow and keep in her kitchen window to cook with. I figured we'd start with the basics: Sweet Basil and Italian Flat-Leaf Parsley, the 2 easiest and most common culinary herbs. I saw this Tuscan Painting Kit in a craft store the other week and the picture on the front looked really nice. They use 3 colours of Americana acrylic paint, which you can find in any crafting store, and you create a really great antique-effect ... or so the box claimed! The colours are Tuscan Red, Cranberry Wine and Splendid Gold. The instructions tell you to paint the basecoat with the Tuscan Red. Then you use a sponge (almost the same as the sponge-painted effect when painting a wall in a room of your house) and dab with both the Splendid Gold and the Cranberry Wine (a darker maroon colour) to create the effect.

I was a little apprehensive about the sponge painting part ... having never done it before ... but it was surprisingly easy and I really like the effect! I left the rims plain gold.

These are the two pots after painting:


And after planting ... Sweet Basil is in the pot on the left, and Italian Flat-Leaf Parsley is in the pot on the right:


A couple hints:

The sponge works better if you dampen it before use. Don't leave it wet, but just a little bit damp.

Also, I would use a piece of paper as a blotter. After you dip the sponge into the paint, blot it once or twice on the paper before using it on the pot to remove the excess paint from the sponge. You don't want big blotches.

And finally, the best part about using this type of paint is that is dries very quickly. You won't have to wait long in between coats. I finished this project in two stages: on the first day, I painted the base coat of Tuscan Red on both pots and the bases beneath them. I also painted the rims in gold. I did 2 coats, to make sure the colour was strong. On the second day, I did the sponge-ing. I decided to apply the gold first, waited till dry, then cranberry over top. I wanted a darker look. If you wanted a lighter, gold look ... with the gold as the dominant colour, you would just reverse the order and sponge the cranberry first, and then the gold!


March 28, 2011

A word about Lentils

I have been looking for more healthy and wallet-friendly additions to our regular diet. Lentils seemed like the perfect solution, provided I could find some recipes that everyone here would eat!! Unlike the failed Brussel Sprout experiment of several years ago (there is no way I have found to cook Brussel Sprouts to make them taste good to us), I found several recipes for Lentils which looked promising! You could use them in soups, casseroles, salads, and many other ways. I cooked a pot of lentils (about 4 cups) and then stored the cooked lentils in the fridge - you can keep them in the fridge for at least 3-4 days. The first recipe I tried was a Mediteranean Lentil Salad, pictured in a tupperware container about to be packed up for lunch.

But first, for those unfamiliar with Lentils, here is what you need to know:

Lentils are legumes (along with other types of beans) that are rich in protein and hence are perfect ingredient for a healthy diet. While the most common types in the United States are either green or brown, lentils are also available in black, yellow, red and orange colors. For all the health-conscious people, lentil is the ideal ingredient that you should include in your diet. Unfortunately, many people overlook them, perhaps due to an awful-tasting meal in the past, or simply because of their appearance. But, if you’re after cheap, healthy and delicious meal options, you really should give lentils a taste.

Lentils are a very good source of cholesterol-lowering fiber. Not only do lentils help lower cholesterol (and help prevent heart disease), they are of special benefit in managing blood-sugar disorders since their high fiber content prevents blood sugar levels from rising rapidly after a meal. Lentils also provide slow burning complex carbohydrates, giving you plenty of energy. Lentils also provide good to excellent amounts of six important minerals, two B-vitamins, folate, magnesium, contain many (although not all) of the essential amino acids, and are a good source of iron and protein - all with virtually no fat. There are only 230 calories for a whole cup of cooked lentils.

Some Cooking Tips: 
 
Compared to other types of dried beans, lentils are relatively quick and easy to prepare. They readily absorb a variety of wonderful flavors from other foods and seasonings, are high in nutritional value and are available throughout the year.

Lentils can be prepared the day of serving since they do not need to be pre-soaked.

Before washing lentils you should spread them out on a light colored plate or cooking surface to check for, and remove, small stones or debris. After this process, place the lentils in a strainer, and rinse them thoroughly under cool running water. Drain.

To boil lentils, use three cups of liquid (water or broth) for each cup of lentils. Lentils placed in already boiling water will be easier to digest than those that were brought to a boil with the water. When the water returns to a boil, turn down the heat to simmer and cover. Simmer until tender. Depending on the variety and age, cooking time may take anywhere from 15 - 45 minutes.

Salt added to the cooking water will toughen the beans. Add salt only once the lentils are completely cooked.

The high protein content in lentils makes them an excellent meat substitute, and a staple of many vegetarian diets.

Like beans, lentils can cause gas. The more you eat, the more your system gets accustomed to them. But, there are a few tips to try: Some say boiling lentils for 1-3 minutes after adding the liquid helps. Others insist that if you boil the liquid first and then add the lentils to the boiling stock/water that should solve the problem. I would avoid serving lentils on a first date!


Recipe: Mediterranean Lentil Salad


Ingredients:

1 Cup              Lentils, cooked
1 TB                Lemon Juice, fresh
1 TB                Balsamic Vinegar
1 TB                Olive Oil
1                      Red Bell Pepper, diced
2 Cups             Tomatoes, diced
1 jar (6 oz.)      Green Olives (or black Olives), coarsely chopped
1/4 Cup           Capers (optional)
3/4 Cup           Green Onion, sliced

Dressing:
1 TB                Lemon Juice, fresh
1 TB                Balsamic Vinegar
3 TB                Olive Oil
1/2 tsp.            Each of Basil, Oregano, Thyme, Sweet Paprika
1 tsp.               Dill
Salt and Pepper to taste


Directions:

Toss cooked Lentils with Olive Oil, Lemon Juice and Balsamic Vinegar.

Let Lentils marinate in the fridge for a few hours if you have the time.

Add Red Bell Pepper, Tomatoes, Olives, Capers and Green Onion.

For dressing:

Mix Lemon Juice, Balsamic Vinegar, Herb Seasonings (Basil, Oregano, Thyme, Sweet Paprika) and Dill. Whisk in Olive Oil.

Combine Lentil Salad with dressing and gently stir Salad.

Season to taste with Salt and Pepper.

** If you're planning to bring this Salad with you in a tupperware for lunch, like I did, I would suggest packing the dressing in a separate container and adding it to the salad just before serving **